Accounts Payable automation in 2026: what's actually new, what's hype, and how to build it yourself
A practitioner's guide to automating accounts payable workflows. What the last decade of tools could and couldn't do, why LLM vision moved the line, and a real blueprint for building your own automation in a weekend.
If you landed here, you probably asked a version of the same question: how do I automate my bookkeeping? It’s the right instinct, and it’s also unanswerable as stated. “Bookkeeping” isn’t one thing. It’s accounts payable, accounts receivable, bank reconciliation, accruals, and the reporting that sits on top. Each has different economics. Each breaks in different places. Automating bookkeeping is like automating cooking.
So let’s narrow it before you spend the next couple minutes reading. The single highest-leverage corner of bookkeeping to automate first is accounts payable — incoming supplier invoices. It has the right shape for automation: high volume, standardised inputs, clear outputs, repetitive decisions, and a painful backlog every month-end. It’s also where the new generation of AI tools has genuinely changed the math.
What “automation” actually means
Before you can automate accounts payable, you need to know what you’re actually automating. Most people vastly underestimate this. A supplier invoice isn’t a single task — it’s a chain of decisions, any one of which can fail.
Anatomy of an invoice
Click a stage to see what actually has to happen before the invoice moves on.
Stage 1. Arrival
What channel did the invoice arrive through?
By now you can probably see why accounts payable is one of the highest-leverage parts of bookkeeping to automate. In most setups today, there’s a person walking through most of these steps — for every single invoice that lands in the pipeline.
Automated means software does most of it, and a human handles the exceptions that don’t fit. The entire game is about how much of that long chain you can safely hand off to a machine, and at what cost.
The four generations of automation (before AI)
Accounts payable automation has been a product category for roughly 30 years. Four generations of tools have taken a crack at it, and understanding them matters — because most of what’s sold today is still a version of one of these four, sometimes with a sprinkle of “AI” on the marketing page.
Four generations
Click a year to see what that generation could and couldn't do.
"If sender is X, code it as Y."
Most of you are probably pinned somewhere between 2007 and 2016 — a template OCR bolted onto a workflow that hasn’t been touched since. Each generation really was an improvement on the last, none of them solved the problem. Until recently, the best-in-class setups using template or ML-OCR plus a workflow tool could get you to roughly 60-70% straight-through processing — meaning that share of invoices made it from inbox to posted without a human touching them. The remaining 30-40% needed human coding, exception handling, or manual re-keying, which is where the savings quietly leaked away.
But running the system is only half of it. The real tax is setup and maintenance. New supplier? Make a template. Supplier redesigns their PDF? Fix the template. Someone wants a new cost-centre rule? Update the rules. Multiply across a few hundred suppliers and you effectively have one-and-a-half FTEs just keeping the automation running. That tax is what AI has actually made disappear.
What changed: the new math
Here’s the shift in one sentence: you can now hand an invoice to an AI and ask it almost anything — is this an invoice? who sent it? what’s the total? does the bank account look right? — and get a clean answer in about three seconds, for a cost so small you’ll struggle to find it on the bill.
That wasn’t possible three years ago. Reading and understanding invoices has been a research topic for a decade, but the price to actually do it at volume was out of reach. Now it’s fractions of a cent per invoice. Often less than the ink it takes to print the thing in the first place.
Cost to process a single invoice
Roughly what each approach costs you, per invoice.
A clerk keying every field into the ERP. 10 minutes per invoice, fully-loaded salary.
OCR reads what it can, a human checks and fixes the rest. Best-in-class pre-AI automation.
What a modern AI charges to read and structure one invoice. Software and humans-on-exceptions still sit on top.
And here’s the thing most people miss: this isn’t just cheaper OCR. A modern AI will read an invoice, notice that the bank account differs from every prior invoice by the same vendor, cross-reference the supplier’s VAT number against your master data, and flag the whole thing for review — in one step, without anyone writing rule logic. That’s a fundamentally different kind of capability than old OCR-plus-rules stacks. The price is just the bonus. The real upgrade is the workflow — no more templates to build, no more rules to maintain, no more “this supplier changed their PDF layout” fire-drills. It just reads.
And it keeps getting cheaper
AI prices have fallen 10x in two years, and the curve keeps heading down. Whatever you pay today is the most you’ll ever pay. Plan for the tide, not the waterline.
So do you even need AI?
Hold on before you rewrite your stack. Throwing a language model at every invoice is how you end up paying AI to decide that yes, the monthly Slack invoice is still for Slack. Here’s where AI earns its keep, and where a rule — or nothing at all — does better.
Where AI is the right tool
- Long-tail suppliers. The 200+ vendors who each send you 1-3 invoices a year. You could template all of them; nobody does. AI handles the whole tail from day one.
- Layout changes. A supplier redesigns their PDF every quarter. Template OCR means someone redraws the template. AI doesn’t notice the change.
- Coding with context. “Is this Microsoft invoice for Azure or Office 365?” You can write a rule for every edge case — and keep writing them. AI reads the invoice description and your coding history in one step.
- Exceptions and judgement. “This vendor normally bills us €1,000 — why is this one €6,000?” Rules catch the thresholds you’ve thought to write. AI flags anomalies you hadn’t anticipated.
- Free-text interpretation. Spotting “please remit to new IBAN DK1234…” buried in a payment paragraph. Regex catches the pattern; recognising it’s different from the vendor master is another layer of glue code. A modern model does both in one pass.
- Fraud signals. Vendor-account-change emails, near-duplicate invoices, amounts outside history. Rules catch the patterns you’ve seen. AI catches the ones you haven’t.
Where AI is the wrong tool
- Structured data you already have. If an invoice arrives via PEPPOL or NemHandel, the data is already clean and parseable. You don’t need AI to read it — you just parse it. Roughly 40% of Danish B2B volume flows through PEPPOL; grab that first, hand the rest to AI.
- Truly identical recurring invoices. Same SaaS subscription, same amount, same date, every month? A one-line rule is cheaper, faster, and more auditable than a model call.
- Audit-critical postings. Rules give the same answer every time, no matter what. AI gives the same answer almost every time — which isn’t the same thing. Use it to suggest, not to decide.
- Payment release. AI should suggest what to pay. It should never be the thing that actually releases money. That’s not an efficiency gain, it’s a fraud vector with a single point of failure.
The right answer is almost always hybrid
A well-designed workflow parses structured EDI where it exists, uses rules for truly identical recurring invoices, uses an LLM for everything else (which is most of it), and keeps a human on the exception queue and payment release.
‘AI’ has replaced ‘cloud’ as the sticker marketing departments spray on every SaaS feature. AI-powered invoice upload, AI-enhanced vendor list, AI-assisted PDF export — none of these need AI. (your boss might need the last one)
Two ways to actually make the move
If you’ve read this far, you’re probably either running a legacy stack — Continia and friends — or still keying invoices by hand. The hybrid setup we just described doesn’t exist on either side. Two ways to get there: Buy a managed AI agent — you pay, it runs — or Build your own pipeline — you own it, you run it.
Pick Buy if
- You want the result, not the construction
- Troubleshooting isn’t your idea of a good weekend
Pick Build if
- You’d rather understand the machinery than outsource it
- You have a weekend of curiosity and some patience
Here’s what changed quietly over the last year: building this used to be engineer work. It isn’t anymore. With a visual workflow tool like n8n, Anthropic’s API, and an AI coding assistant, anyone willing to spend a weekend learning can put together a working end-to-end pipeline. No computer science degree, no team of developers, no prior experience with APIs. The only real barrier is whether you’re interested enough to start.
Full disclosure
We built the Buy option — FA Finance is an AI agent for AP and AR on Business Central, Uniconta, e-conomic, and Dinero. We won’t pretend otherwise. But this guide is about teaching you the domain, not selling you. The DIY walkthrough below is the simplification of the architecture we run internally.
Build it yourself: a blueprint
Now to the fun part. Here’s a working end-to-end blueprint, using tools that cost essentially nothing — and you don’t need to be a developer to follow it.
You’ll need five things:
- An email inbox for invoices
- An Anthropic API key (console.anthropic.com)
- Claude, or any general-purpose AI assistant (optional but recommended)
- A Make.com account (free tier works to get started)
- Super user permissions in your ERP system
A quick intro to the tools
Before we start, a short orientation on the three pieces you’ll be using. They sound more intimidating than they are.
Anthropic API — Pay-per-use, ~$0.02 per invoice on Claude SonnetThis is the AI itself. You send it an invoice (PDF or image) along with a question — what’s the total? who sent it? does the bank account look right? — and it sends back an answer. You don’t install it; you just make requests to it from your workflow tool.
Make.com — Free tier (1,000 operations/month), then €9/month on the Core planA web-based workflow builder. You drag little modules onto a canvas and connect them with lines. Each module does one job: watch an inbox, call Claude, read from your ERP, post a Teams message. Make has native modules for Gmail, Anthropic, Microsoft Dynamics 365 Business Central, Microsoft Teams, and Slack — meaning you never have to touch raw API calls.
Claude — $20/month (Pro plan). Recommended as your “personal assistant” but optional.A general-purpose AI assistant. When something breaks, you describe the problem and it helps you fix it. When there’s a step you don’t understand, ask it to explain in plain English.
How they fit together. Every invoice still goes through the same eight stages we described earlier — arrival, identification, entity check, vendor check, coding, validation, matching, and approval & posting. The tools divide the work: Make is the traffic controller running the chain; the Anthropic API does the reading-and-understanding work (identification, vendor context, coding, validation); approvals and exceptions are routed to a human via Microsoft Teams (or Slack, or email) — wherever your team already lives, not yet another portal. Claude is your sounding board when something doesn’t behave or a step doesn’t make sense — you describe the problem in plain English and get a fix or an explanation back.
Let me tell you something. Once you’re comfortable with these tools, if you can write it down, you can automate it.
Step 1: Get your accounts and keys
What you’re adding: nothing in Make yet — just the five things you need in hand before you start building. Allow 15-20 minutes.
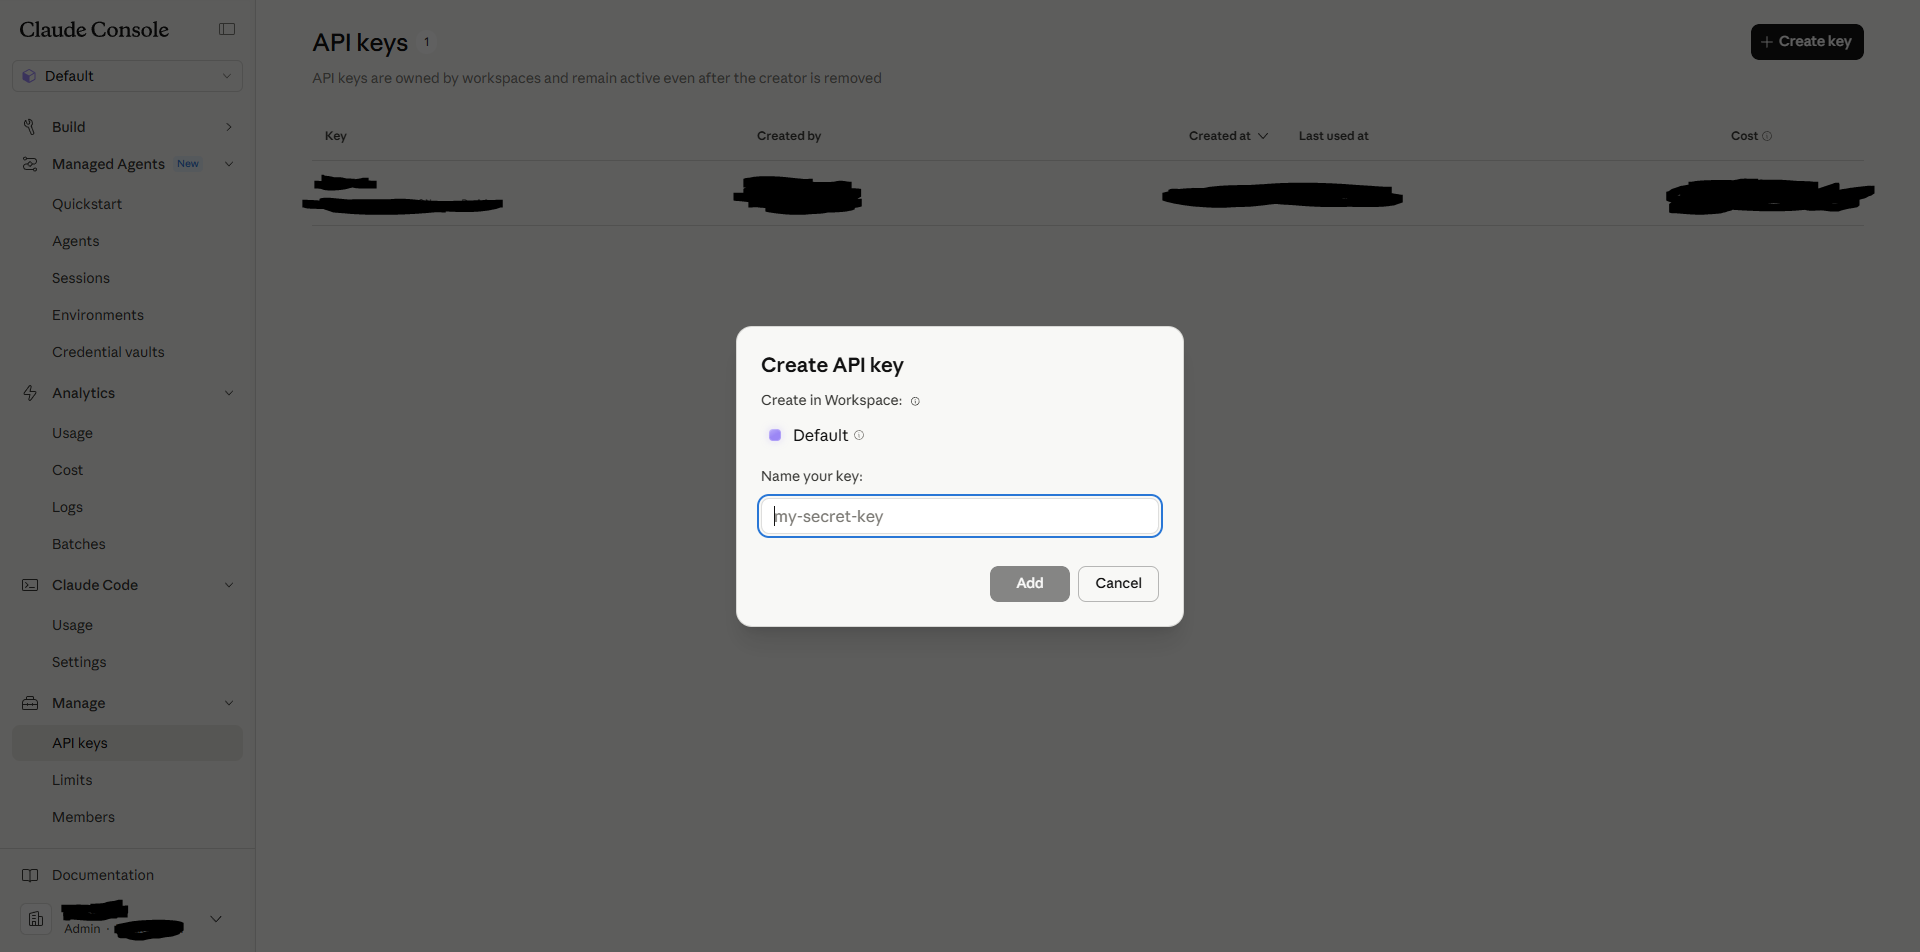
1a. Anthropic API key. Go to console.anthropic.com and sign up. Click “API keys” in the left sidebar and generate a new one. Copy it to a notepad — Anthropic will never show it to you again.
While you’re there, click “Billing” and add $20 of credit. That’s enough to process roughly 1,000 invoices on Claude Sonnet.
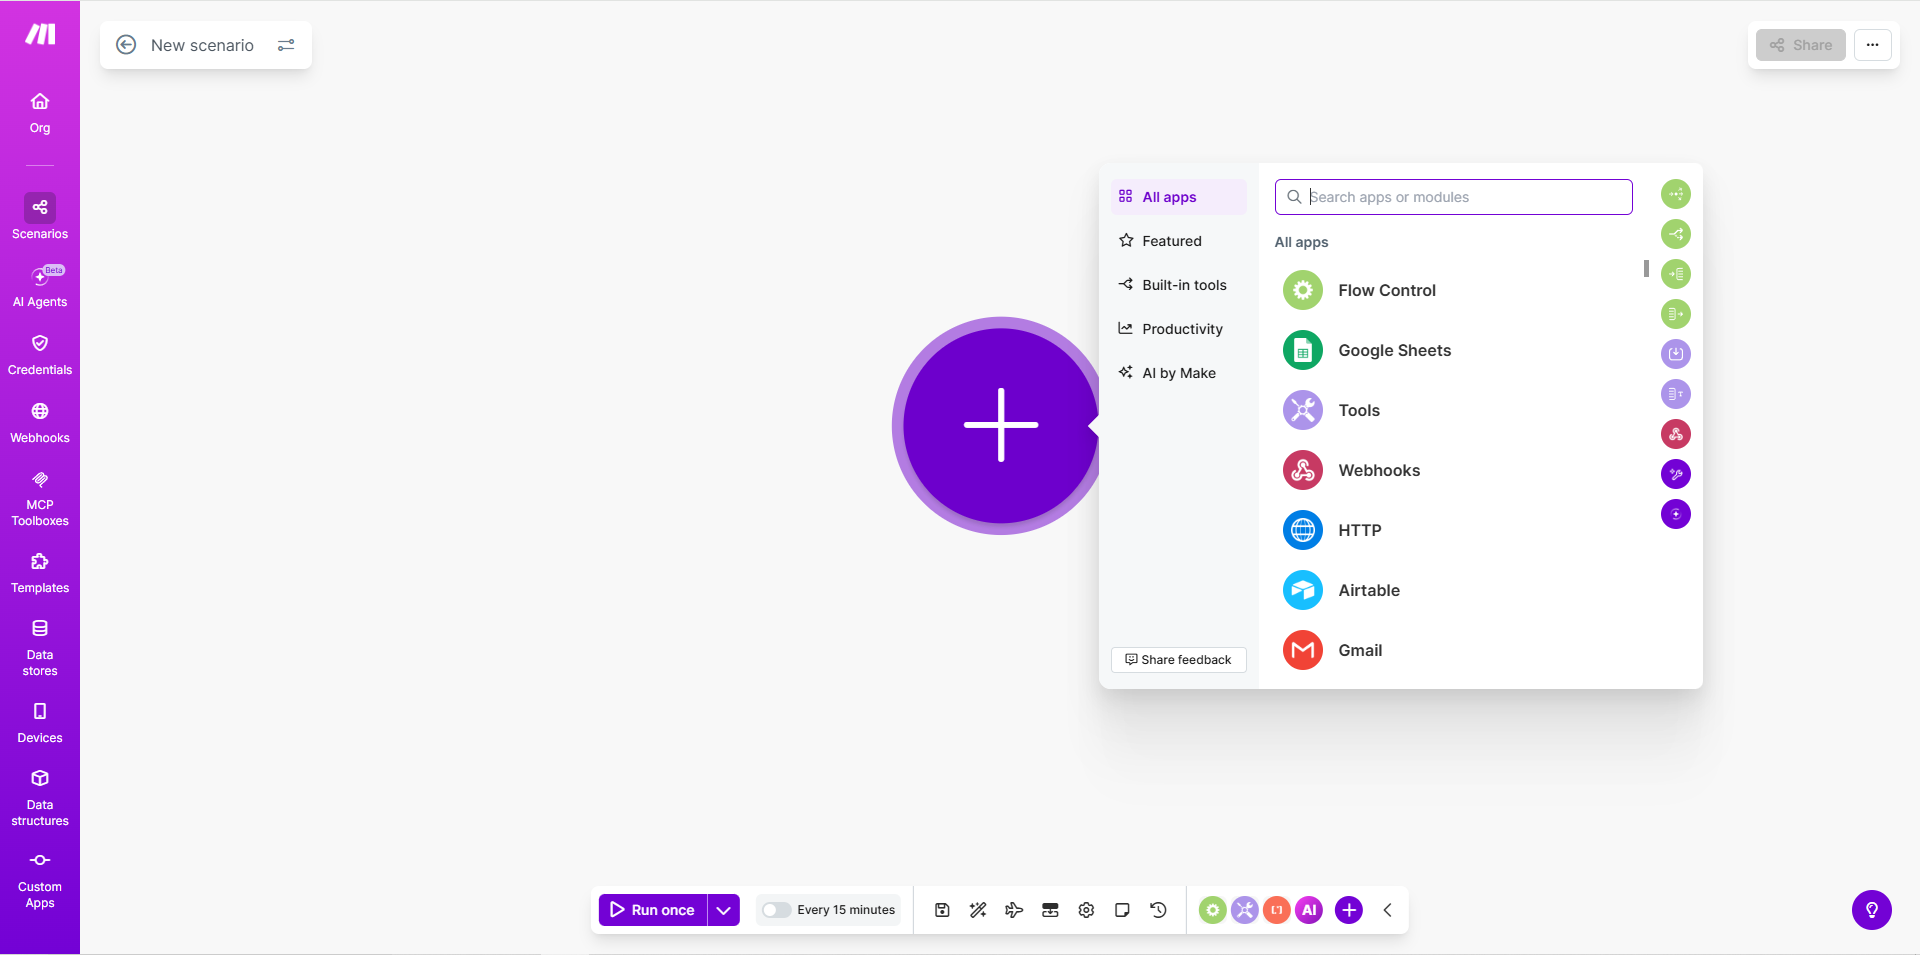
1b. Make.com account. Go to make.com and sign up — the free tier (1,000 operations/month, 2 active scenarios) is plenty to get going. Once in, click “Create a new scenario” in the top right. Leave the empty scenario canvas open — that’s your studio for the rest of the guide.
In Make’s vocabulary: a scenario is your whole workflow, and each step inside it is a module. You build by dragging modules onto the canvas and drawing lines between them.
1c. A dedicated invoice inbox. Create a fresh email address — invoices@yourcompany.com or similar. Every supplier will be told to send their invoices here from now on. If you’re on Google Workspace or Microsoft 365, create it as a regular user. Make sure you personally have access to the login.
1d. Business Central access. You (or your BC admin) need to set up OAuth2 API access. This is the most technical one-time hurdle in the guide — but once it’s done, Make remembers the connection forever. Two sides: Azure, then BC.
In Microsoft Entra admin center:
-
Open Microsoft Entra ID → Overview and copy your Tenant ID.
-
Go to Identity → Applications → App registrations → New registration. Name it
Make. Pick Single tenant. -
Under Redirect URI, choose Web and paste:
https://www.make.com/oauth/cb/microsoft-d365-bc -
Click Register. Copy the Application (client) ID from the Overview page.
-
Open Certificates & secrets → Client secrets → New client secret. Give it a name and expiry. Copy the Value field immediately — Azure never shows it again. (Don’t confuse Value with Secret ID — you need Value.)
-
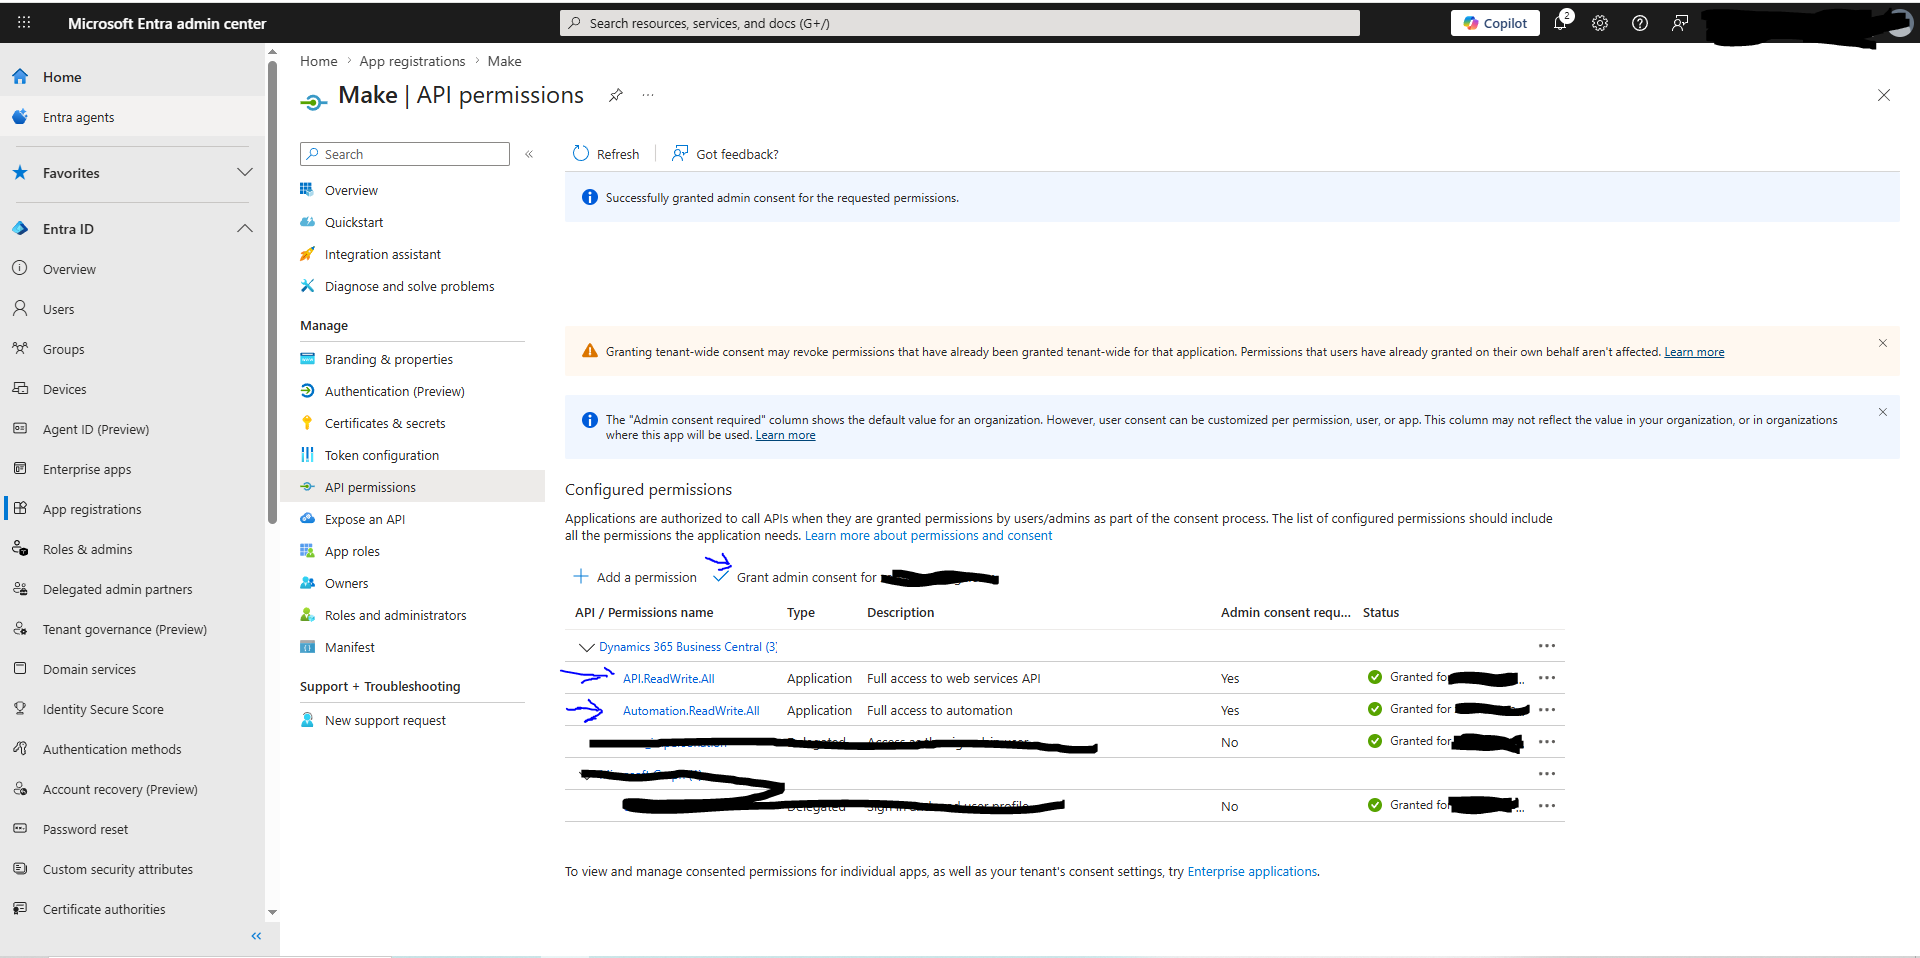
Open API permissions → Add a permission → Microsoft APIs → Dynamics 365 Business Central. Switch to the Application permissions tab (not Delegated), then tick both:
API.ReadWrite.AllAutomation.ReadWrite.All
Click Add permissions. Make needs both — the first for reading/writing invoices and vendors, the second for listing companies and environments.
-
Grant admin consent. This is the step most people miss, and it’s what causes 401 errors later. On the API permissions page, click the “Grant admin consent for
{tenant}” button at the top. You’ll need Global Admin rights for this. Both permissions should now show a green checkmark under the Status column — “Granted for{tenant}”. Without this, the permissions are configured but inactive.
In Business Central:
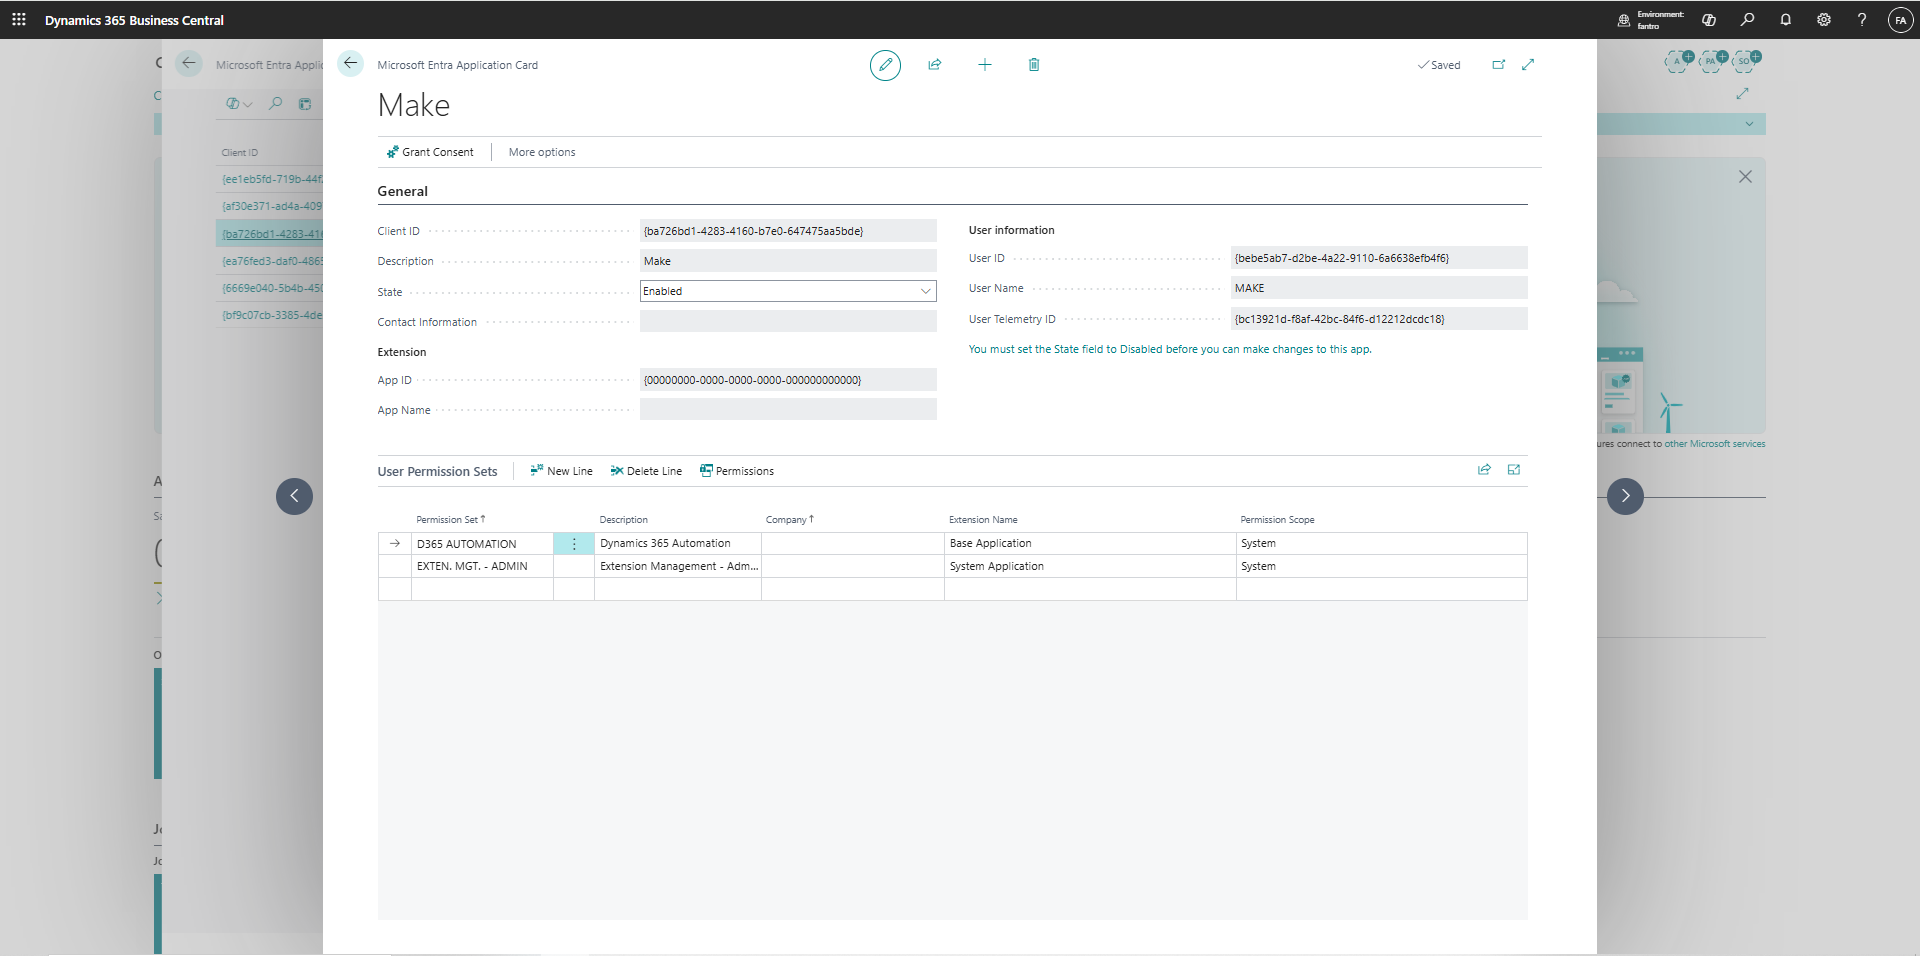
- Search for Microsoft Entra Applications and click New.
- Paste the Client ID from step 4. Set State to
Enabled. - Assign the permission sets
D365 AUTOMATIONandEXTEND. MGT. - ADMINto the app.
You now have three values to save: Tenant ID, Client ID, Client Secret (the Value, not the Secret ID). Make will ask for all three when you create the BC connection later.
Troubleshooting if the connection still fails: At the top of the BC app card there’s a “Grant Consent” button. Most tenants don’t need it — enabling the app is enough — but on some BC versions it’s required. If Make gives a 401 when you try to connect later, come back here and click it.
If “Microsoft Entra” and “permission set” meant nothing to you, this is the one place you’ll need to loop in your BC or IT admin. Paste these steps into Claude and it’ll turn them into a click-by-click walkthrough.
1e. Claude (optional). Sign up at claude.ai. When something breaks in the next six steps, you paste the error message into Claude and it tells you what’s wrong. Not required — but the difference between “stuck for two hours” and “unstuck in five minutes”.
Step 2: Get one invoice extracted
What you’re adding: two modules in Make — one that watches your invoice inbox, one that hands the PDF to Claude. By the end of this step, you can send a test invoice and see structured data come back.
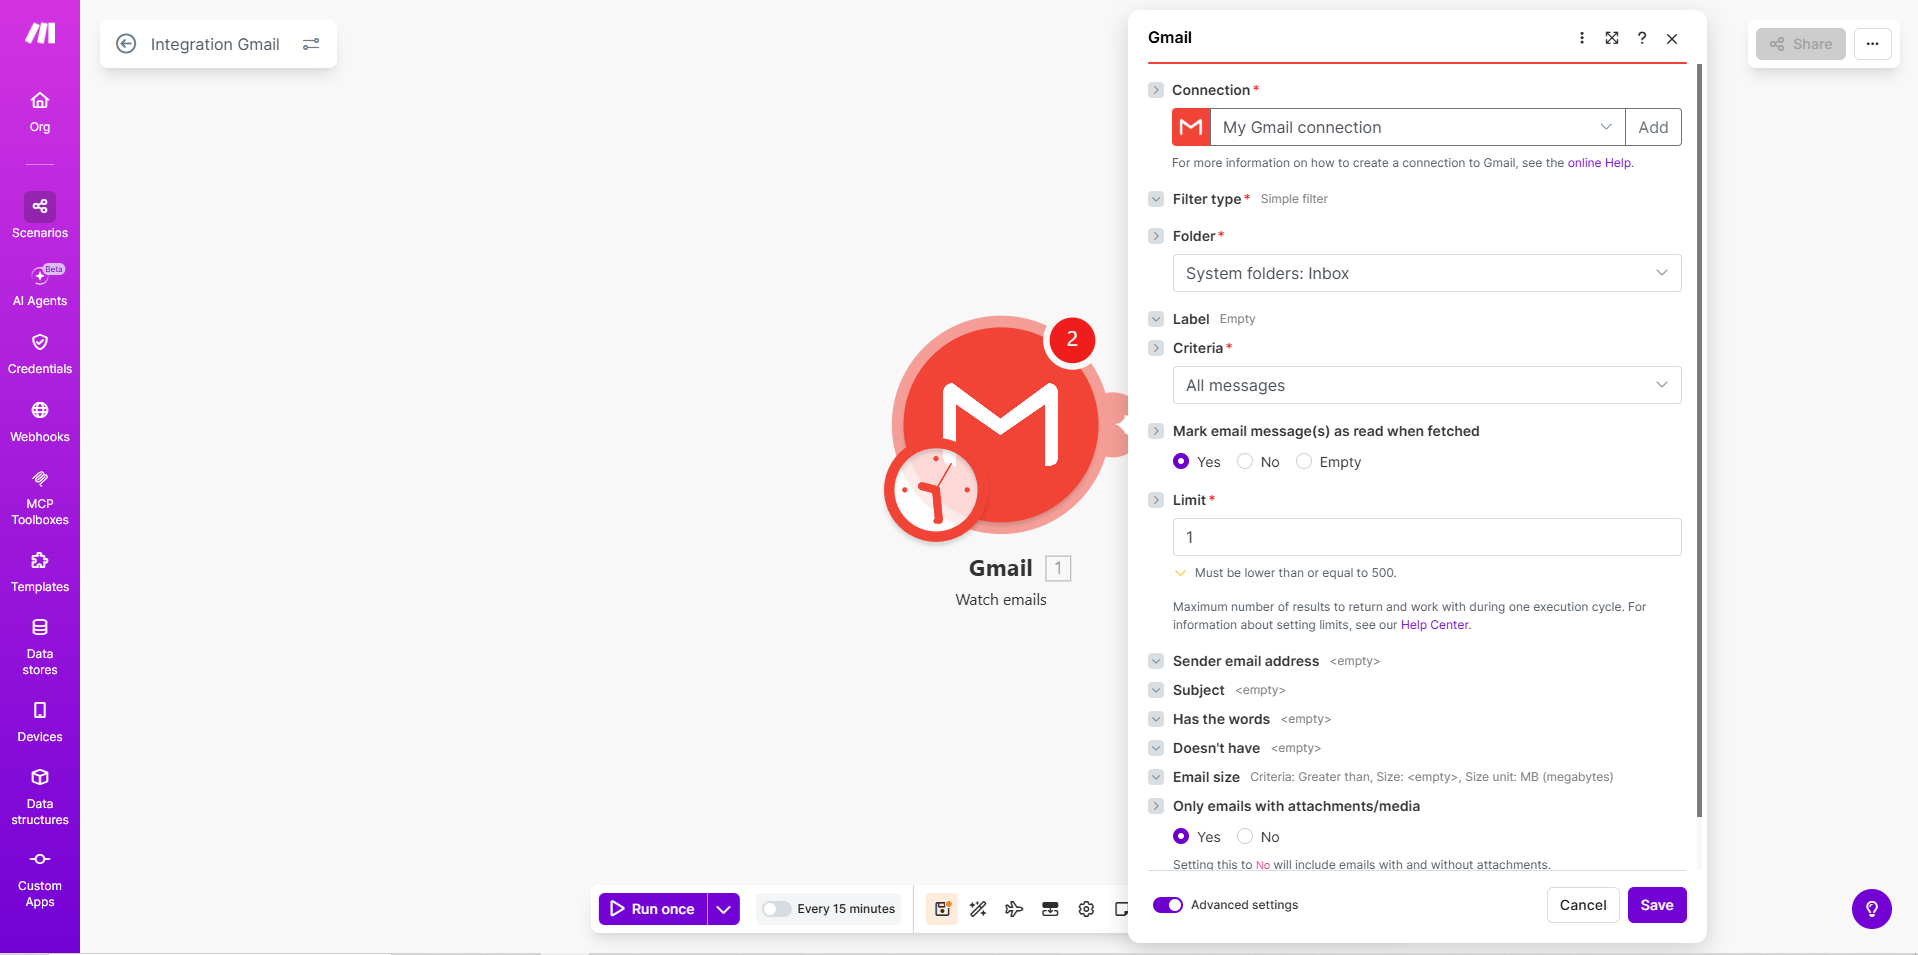
2a. Watch the inbox. In your empty scenario, click the large ”+” in the middle of the canvas. Search for Gmail or Microsoft 365 Email (depending on whether your invoice inbox from Step 1c is on Google Workspace or Microsoft 365) and pick the “Watch Emails” module. Make prompts you to connect the account — log in as the invoices@ user.
Settings:
- Folder:
System folders: Inbox - Criteria:
All messages - Mark email message(s) as read when fetched:
Yes - Limit:
1(we process one invoice at a time — keeps runs simple and easy to debug) - Only emails with attachments/media:
Yes
Click Save. Make pops up a small dialog asking when the module should start processing emails from — pick “From now on”. That way the workflow only reacts to new invoices going forward, not every email that’s already in the inbox.
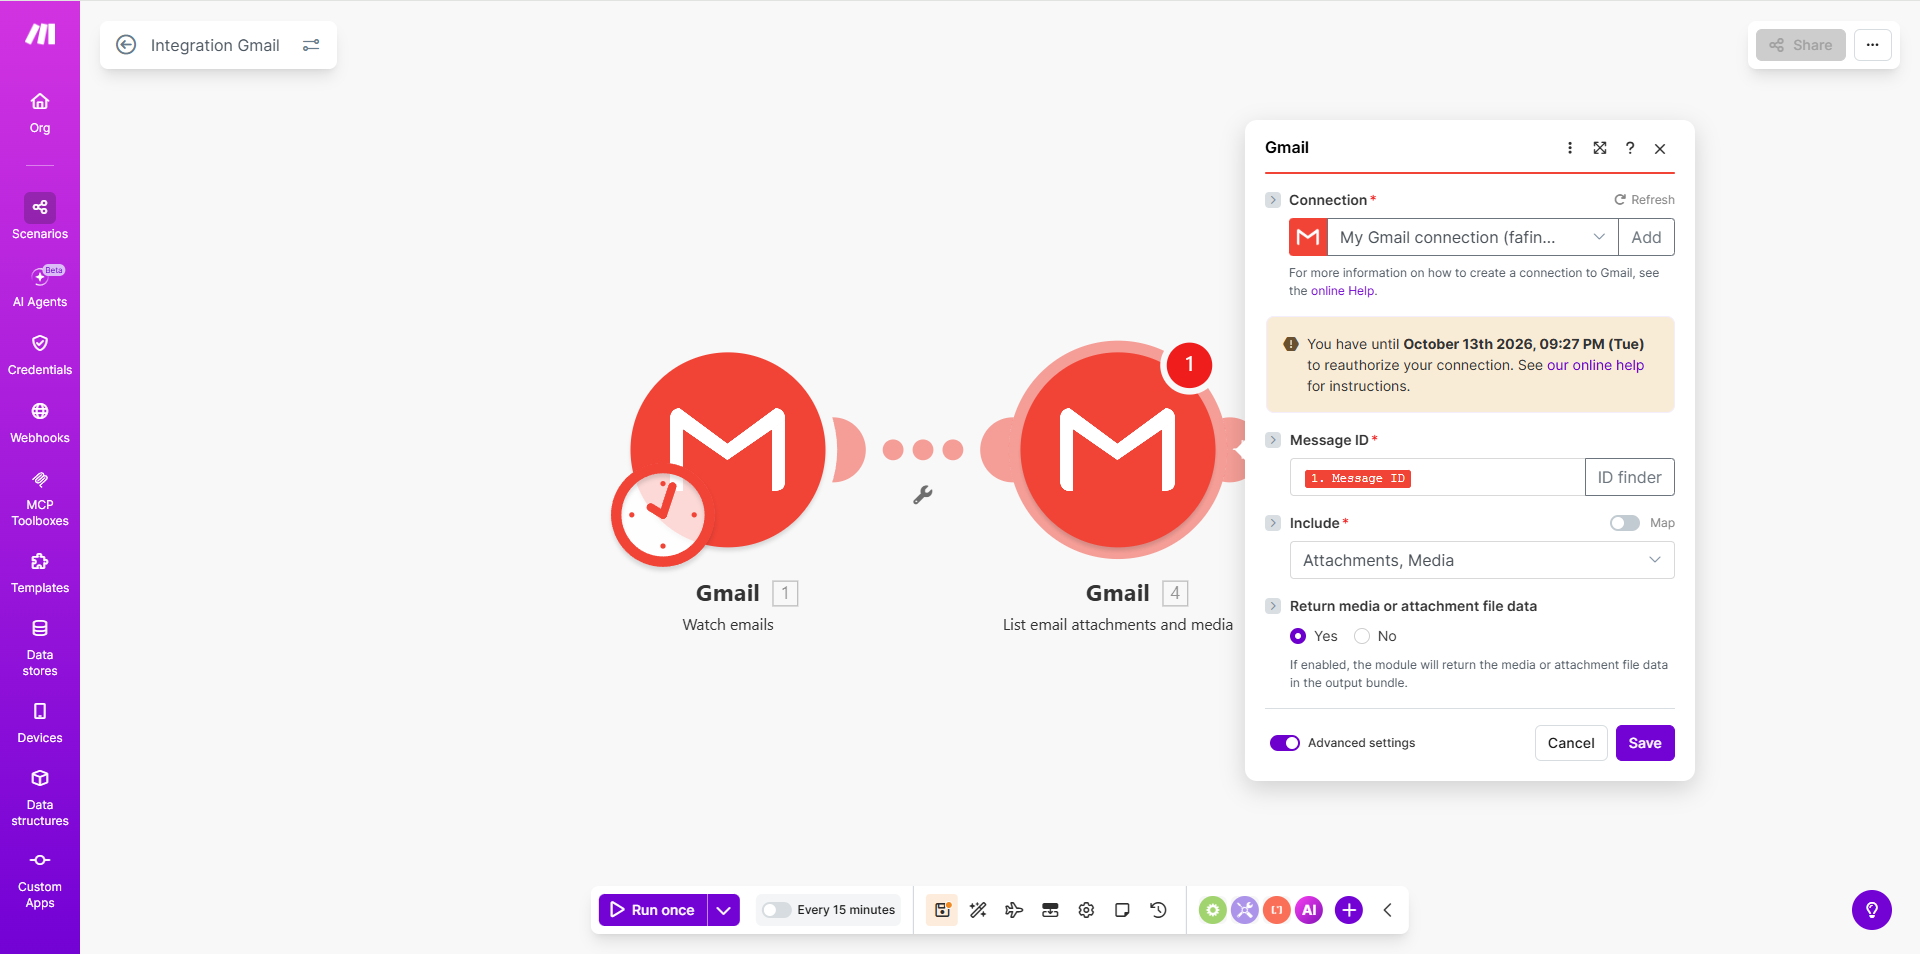
2b. Fetch the attachment content. The Watch Emails module only fetches email metadata, not the actual PDF bytes. You need a second Gmail module to grab the content.
Click the semicircle on the right of the Gmail Watch Emails module. Search for Gmail again and pick “List email attachments and media”.
Settings:
- Connection: same Gmail connection as Watch Emails
- Message ID: map from Watch Emails →
{{1.messageId}} - Include:
Attachments, Media - Return media or attachment file data:
Yes
This returns one bundle per attachment with the binary content included. Make will automatically run the rest of the chain (Anthropic, validation, posting) once per attachment — multi-PDF emails handled for free, no Iterator needed. We’ll add a filter to skip non-PDF attachments in a moment, once the Anthropic module is in place.
2c. Hand the PDF to Claude. Click the semicircle on the right of the List Attachments module. Search for Anthropic Claude and pick the “Create a Prompt” module. Make asks for your API key — paste the one from 1a.
The Anthropic module has three places where you put instructions — and once you know what belongs where, the setup becomes very clean:
- Messages → User → Content — the dynamic input (the PDF itself, mapped from List Attachments)
- System Prompt (under Advanced settings) — the model’s role and behavioural rules
- Output Format → Schema (under Advanced settings) — the exact JSON shape the model must return
Each step below maps to one of those pieces.
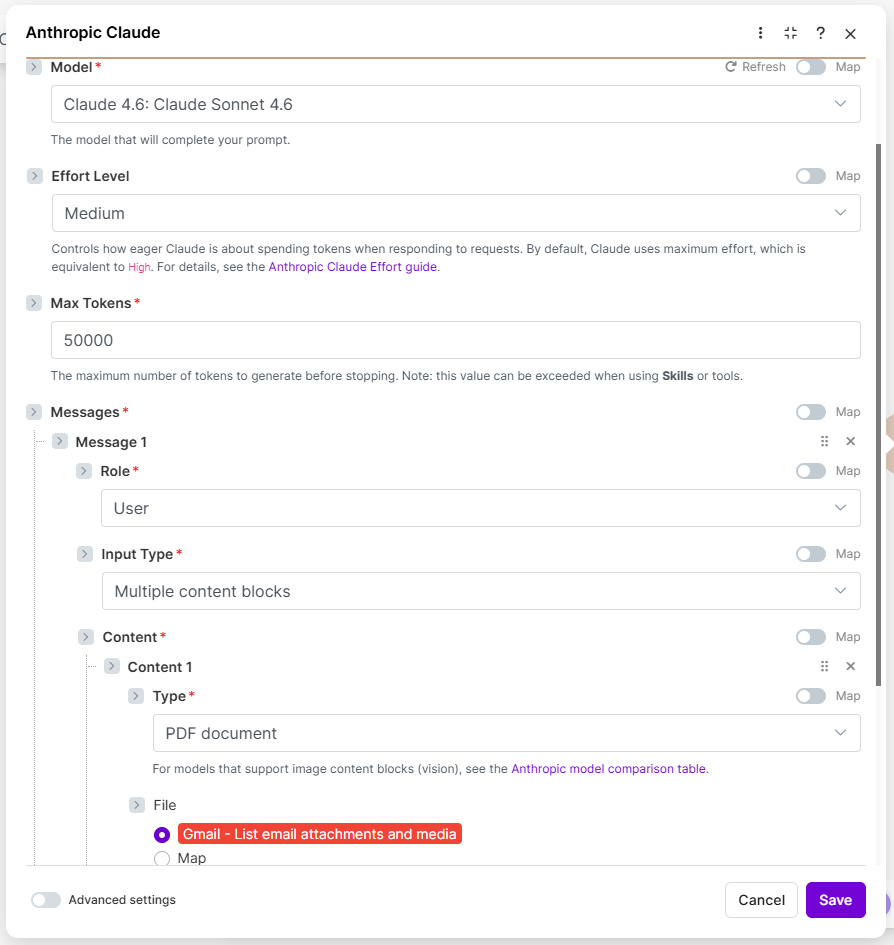
Top-level settings:
- Model: Claude Sonnet (pick the latest)
- Max Tokens:
50000(the default is fine) - Toggle Advanced settings ON at the bottom — System Prompt and Output Format live in there.
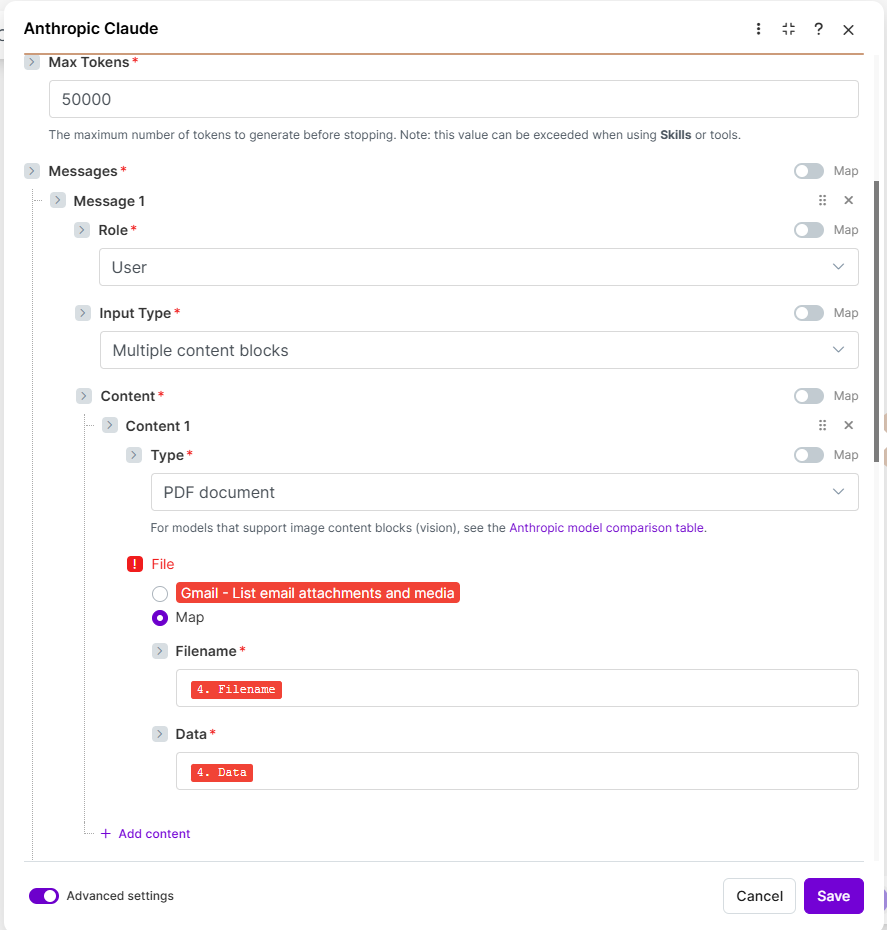
Messages (the PDF input):
- Add message → Role:
User - Input Type:
Multiple content blocks - Content → Add content:
- Type:
PDF document - File: toggle the Map radio ON
- Filename: use the field-picker to select the List email attachments and media module’s
Namefield - Data: same pattern — pick the List Attachments module’s
Datafield (the base64 content of the PDF)
- Type:
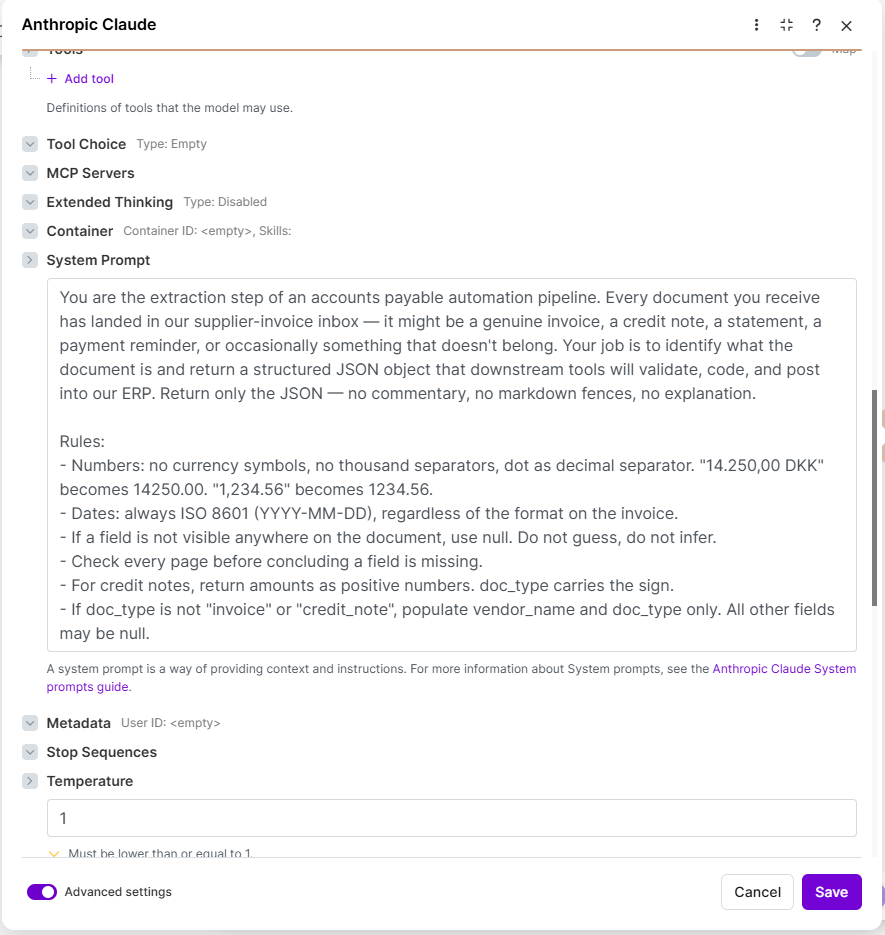
System Prompt (the role and rules):
Paste this text into the System Prompt field under Advanced settings. It tells the model what job it’s doing, without locking in the output structure (that’s the Schema’s job).
You are the extraction step of an accounts payable automation pipeline. Every document you receive has landed in our supplier-invoice inbox — it might be a genuine invoice, a credit note, a statement, a payment reminder, or occasionally something that doesn't belong. Your job is to identify what the document is and return the structured data our downstream tools will validate, code, and post into our ERP.

Rules:
- Numbers: no currency symbols, no thousand separators, dot as decimal separator. "14.250,00 DKK" becomes 14250.00. "1,234.56" becomes 1234.56.
- Dates: always ISO 8601 (YYYY-MM-DD), regardless of the format on the invoice.
- If a field is not visible anywhere on the document, use null. Do not guess, do not infer.
- Check every page before concluding a field is missing.
- For credit notes, return amounts as positive numbers. doc_type carries the sign.
- If doc_type is not "invoice" or "credit_note", populate vendor_name and doc_type only. All other fields may be null.
Output Format → Schema (the JSON shape):
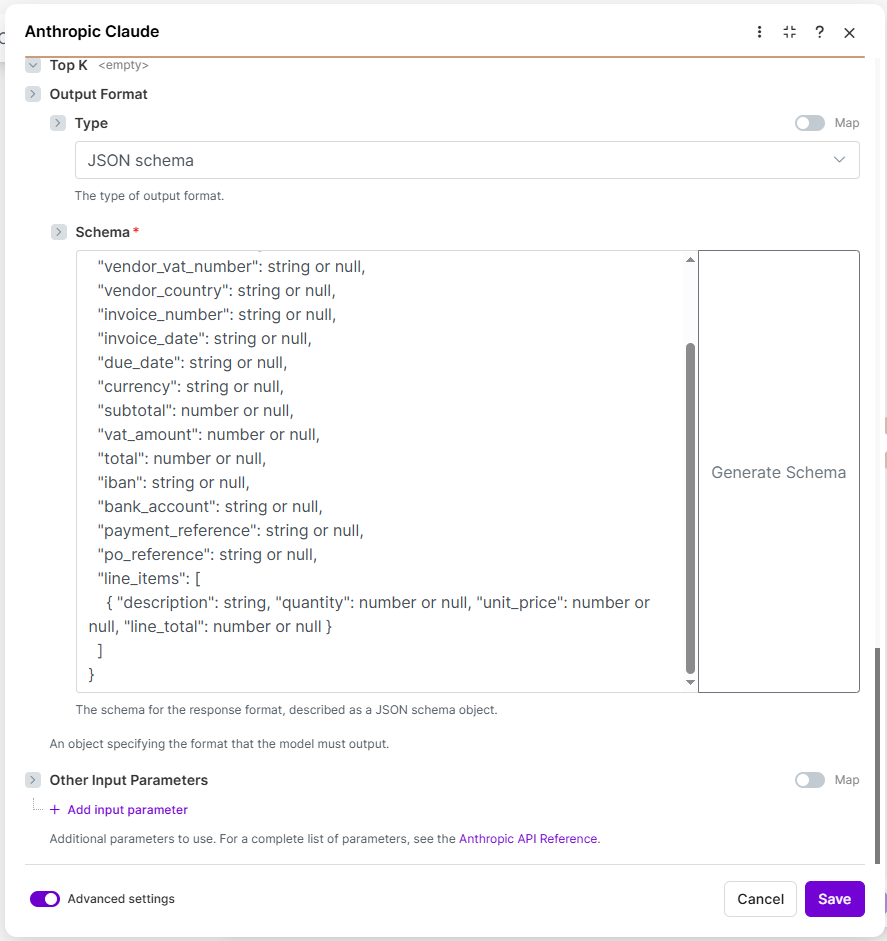
Scroll further down in Advanced settings to find Output Format. Set Type to JSON schema and paste the schema below into the Schema field. This forces the model to return exactly the structure you need — with Schema, Make’s field-picker will even auto-discover the fields (total, vendor_name, etc.) on downstream modules.
{
  "type": "object",
  "additionalProperties": false,
  "properties": {
    "doc_type": {
      "type": "string",
      "enum": ["invoice", "credit_note", "statement", "reminder", "quote", "other"]
    },
    "vendor_name": { "type": "string" },
    "vendor_vat_number": { "type": ["string", "null"] },
    "invoice_number": { "type": ["string", "null"] },
    "invoice_date": { "type": ["string", "null"] },
    "due_date": { "type": ["string", "null"] },
    "currency": { "type": ["string", "null"] },
    "subtotal": { "type": ["number", "null"] },
    "vat_amount": { "type": ["number", "null"] },
    "total": { "type": ["number", "null"] },
    "iban": { "type": ["string", "null"] },
    "payment_reference": { "type": ["string", "null"] },
    "po_reference": { "type": ["string", "null"] },
    "line_items": {
      "type": "array",
      "items": {
        "type": "object",
        "additionalProperties": false,
        "properties": {
          "description": { "type": "string" },
          "quantity": { "type": ["number", "null"] },
          "unit_price": { "type": ["number", "null"] },
          "line_total": { "type": ["number", "null"] }
        },
        "required": ["description", "quantity", "unit_price", "line_total"]
      }
    }
  },
  "required": [
    "doc_type", "vendor_name", "vendor_vat_number",
    "invoice_number", "invoice_date", "due_date", "currency",
    "subtotal", "vat_amount", "total",
    "iban", "payment_reference", "po_reference",
    "line_items"
  ]
}
Don’t worry about understanding every line — just paste.
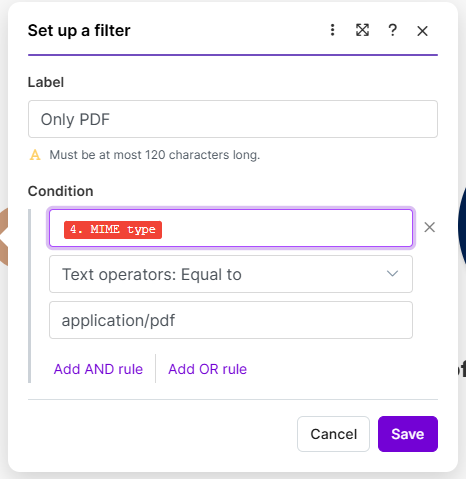
2d. Filter to only PDFs. An email can contain company logos, email signatures, and other non-PDF attachments — List Attachments returns all of them as separate bundles. Without a filter, Claude gets called on every one of those. Token waste, junk output.
Now that both List Attachments and Anthropic are in place, add the filter on the connector between them. Click the wrench icon on the line running from the List Attachments module into Anthropic:
- Label:
Only PDF - Condition: field = List Attachments module’s MIME type (use the field-picker), operator =
Text operators: Equal to, value =application/pdf
2e. Test it. Send any supplier invoice PDF to your invoices@ inbox. Back in Make, click “Run once” at the bottom-left. Click the speech-bubble above the Anthropic Claude module when the run finishes. You should see the extracted fields under JSON Response — Doc Type, Vendor Name, Invoice Number, Subtotal, Total, Line Items, and so on — each as its own clickable field you can use in later modules.
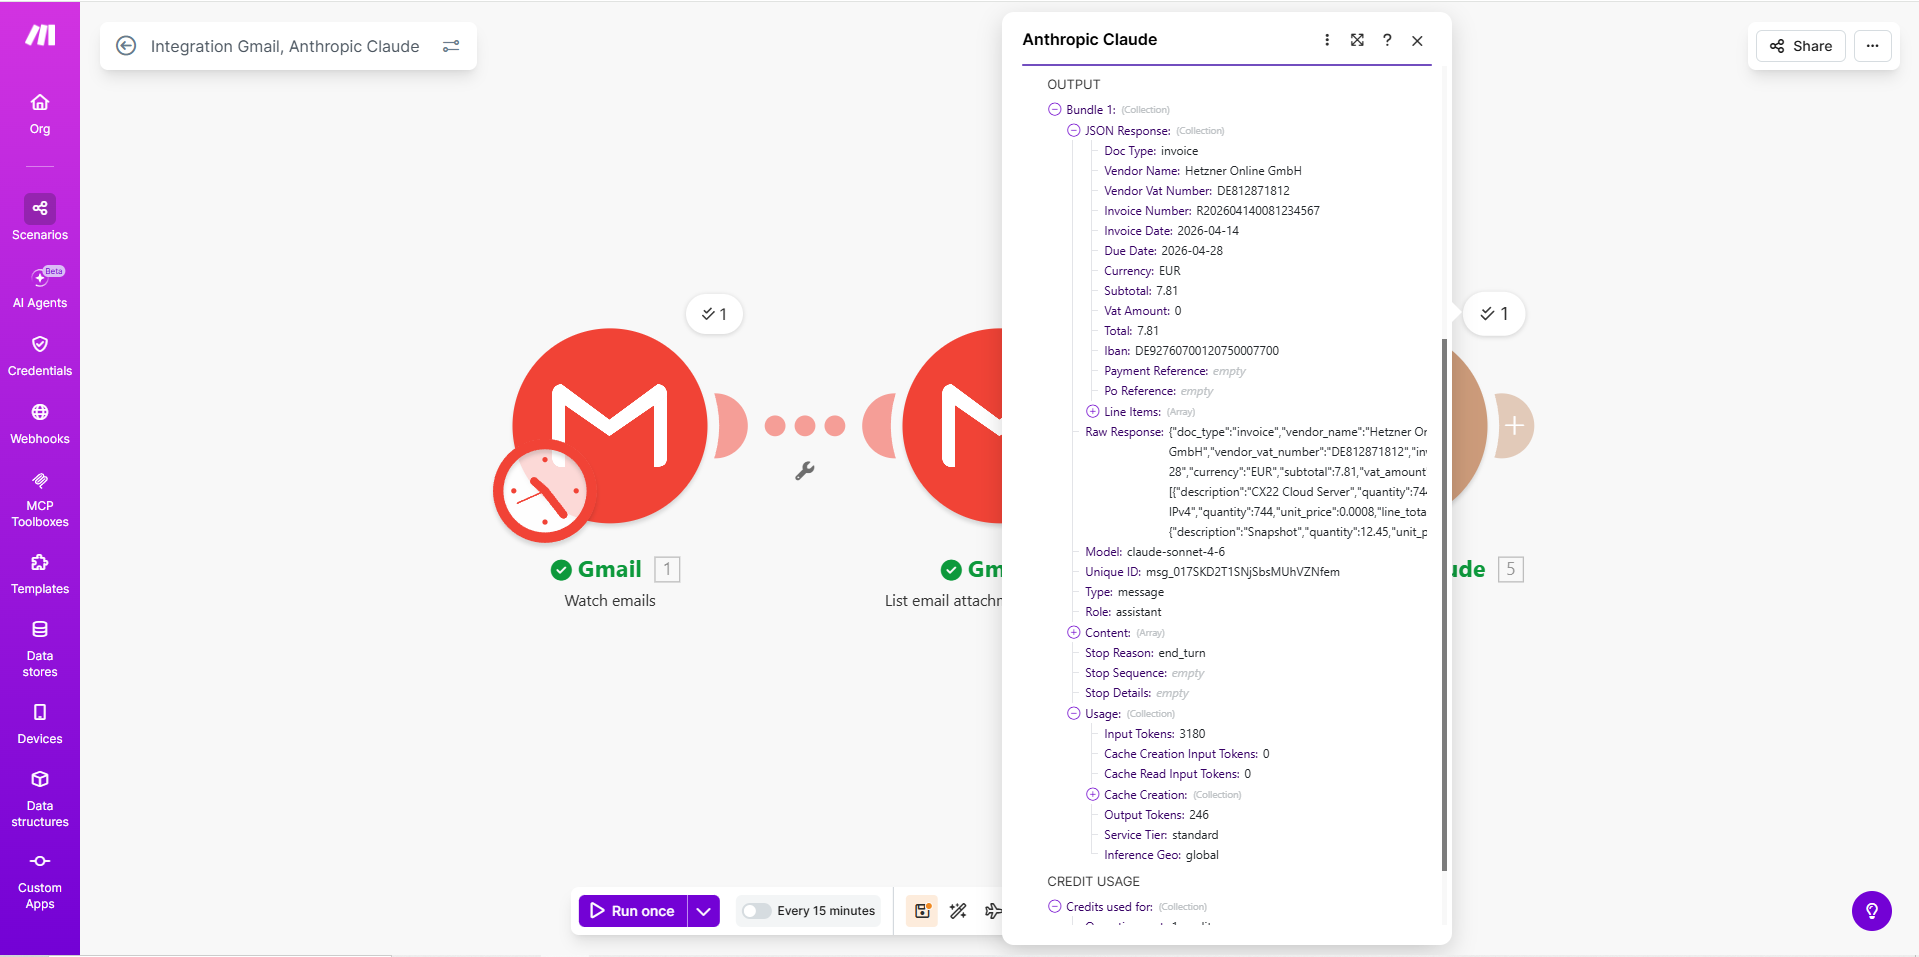
That’s it. That’s the OCR replacement — no templates, no training, just a PDF in and fields out.
What it costs in practice. Scroll down in the output panel to the Usage section. On the Hetzner invoice we tested with, it reported:
- Input tokens: 3,180 (the PDF plus the System Prompt + Schema)
- Output tokens: 246 (the filled-in JSON)
On Claude Sonnet 4.6 pricing ($3 per million input, $15 per million output), that works out to:
- Input cost: 3,180 × $3 ÷ 1,000,000 = $0.0095
- Output cost: 246 × $15 ÷ 1,000,000 = $0.0037
- Total: ~$0.013 per invoice
Real invoices vary a bit — multi-page ones run longer, simple one-pagers run shorter — but this ballpark holds. For 1,000 invoices a month, that’s around $13 in Anthropic spend. Cheaper than the café coffee you drank while setting this up.
Step 3: Teach it to code the invoice
What you’re adding: a Business Central lookup that fetches how this vendor has been coded before, and a second Claude call that suggests a GL account and VAT code based on that history. Two new modules.
3a. Look up the vendor master. Before we code anything, we need to answer two questions from the InvoiceFlow chain: is this vendor already in our master data, and has the bank account changed since last time? Both come from the same lookup.
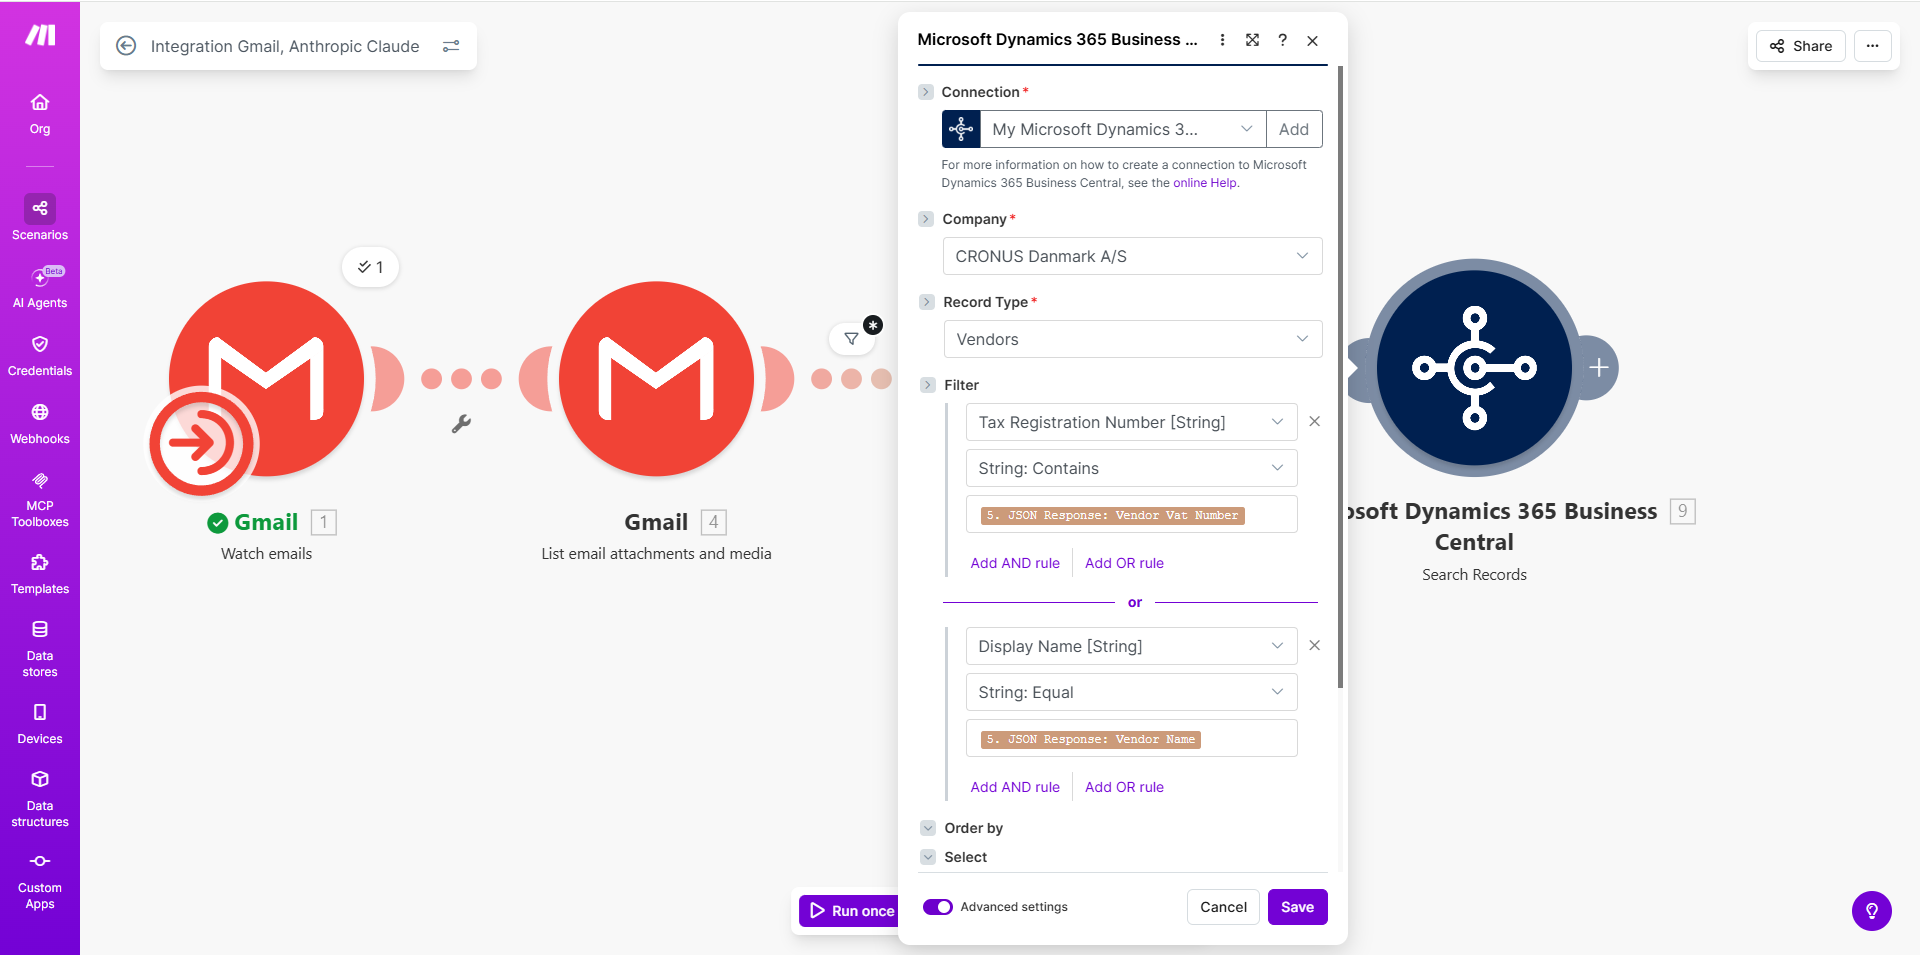
Click the semicircle on the right of the Anthropic module. Search for Microsoft Dynamics 365 Business Central and pick the “Search Records” module.
Make prompts you to create a new connection (you only do this once — reused by every BC module from here on). When it asks for Connection Type, pick Client Credentials — that’s the service-to-service auth flow matching the permissions we set up in Step 1d (API.ReadWrite.All + Automation.ReadWrite.All). Don’t pick Authorization Code — that’s user-based auth and would tie the automation to a specific person’s login.
Make’s connection form splits the URL into separate fields, so you don’t have to assemble it yourself:
- Client ID: from Step 1d
- Client Secret: from Step 1d
- Base URL:
api.businesscentral.dynamics.com/v2.0/— pre-filled, leave it - Tenant ID: from Step 1d (the Azure tenant GUID)
- Environment: your BC environment name. Most companies’ main environment is called
production, but it can also besandbox,test1, or a custom name (e.g. a company nickname). Find the exact name in the Business Central admin center under Environments, or in the top-right corner of BC itself. - Endpoint:
/api/v2.0/— pre-filled, leave it
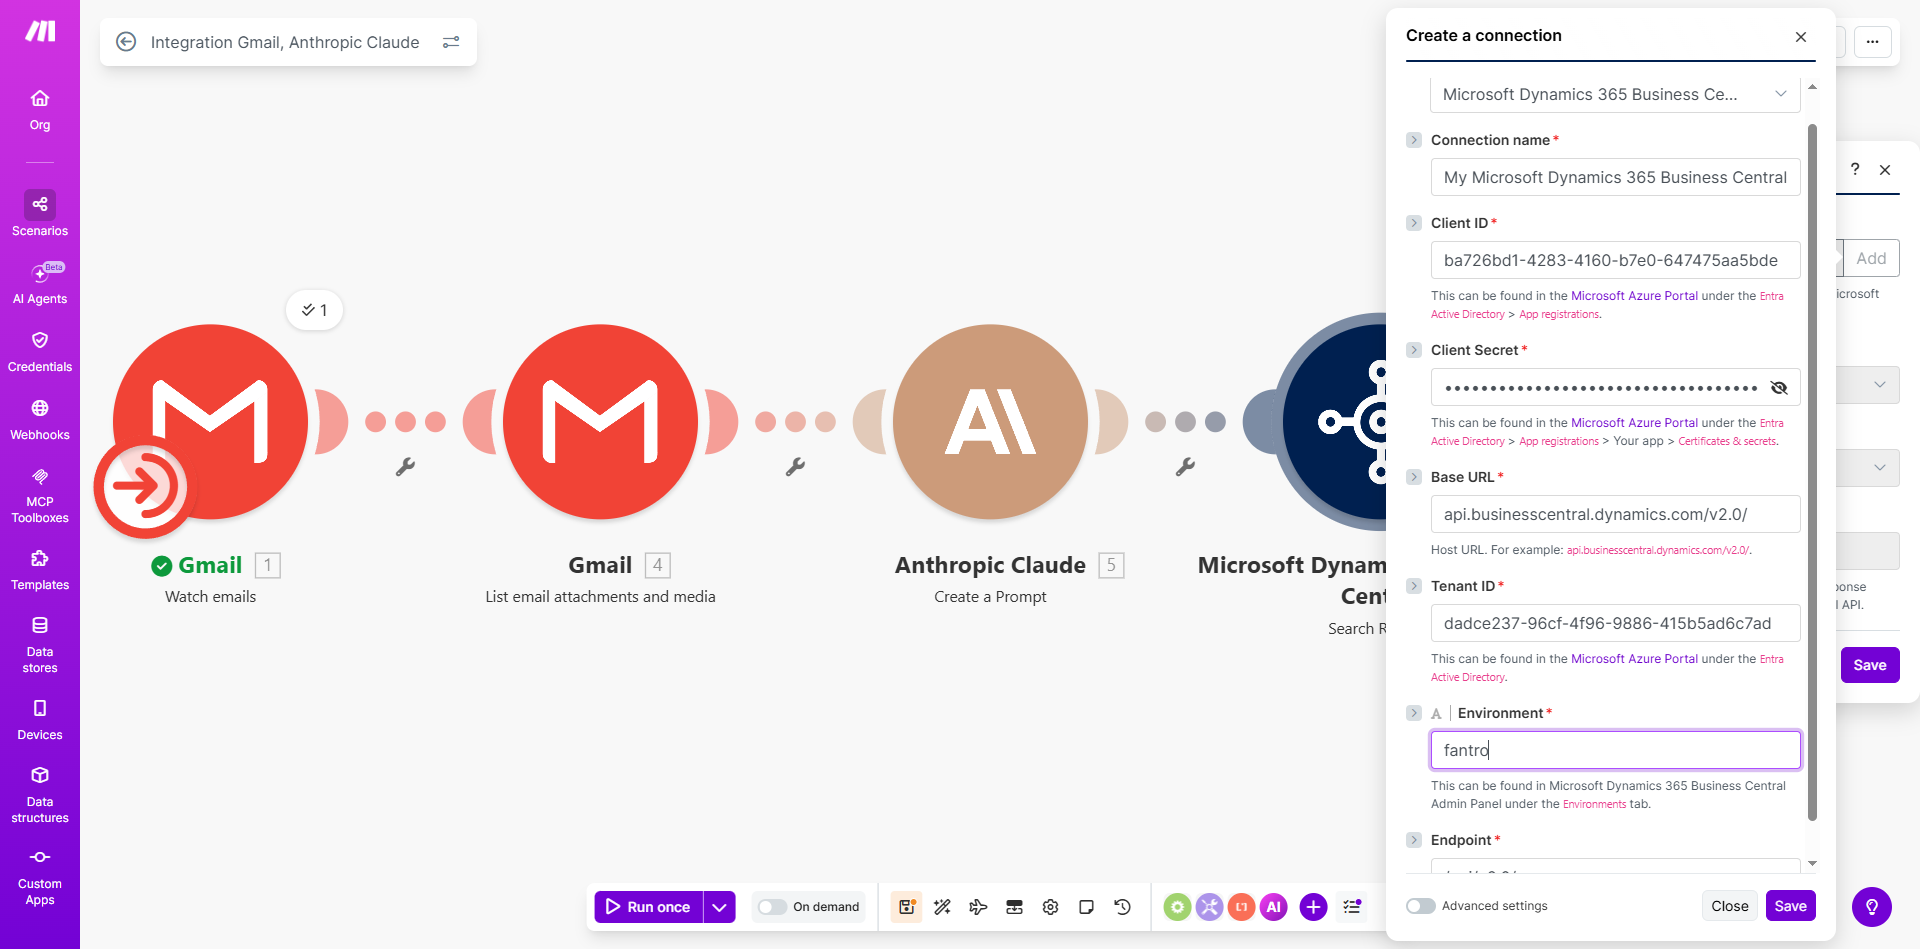
Click Save. Make handles the OAuth2 dance from there.
Now configure the Search Records module itself to look up the vendor. Use two filter conditions joined with OR for fail-safe matching — if the VAT number is malformed or missing on one side, the display-name match still catches the vendor:
- Company: pick your BC company from the dropdown
- Record Type:
Vendors - Filter: two conditions with
OR:- Field = Tax Registration Number, operator =
String: Contains, value = JSON Response → Vendor Vat Number - Field = Display Name, operator =
String: Equal, value = JSON Response → Vendor Name
- Field = Tax Registration Number, operator =
- Limit:
1
Contains on VAT handles whitespace or prefix variations (“DE812871812” vs “DE 812871812”). The display-name Equal is our fallback when the VAT field on the BC record is blank. Either match wins — this is your safety net for messy master data.
This is also why clean master data matters. The entire workflow downstream relies on BC’s vendor records being correct and complete — stored bank accounts accurate, VAT numbers present and properly formatted, one canonical record per legal entity (not three variants of “Acme Corp”). If your vendor master is messy, this lookup will either miss real vendors or match the wrong one. A week of boring cleanup work here is the single highest-leverage thing you can do before turning any automation on — it raises your straight-through rate more than any prompt tuning ever will.
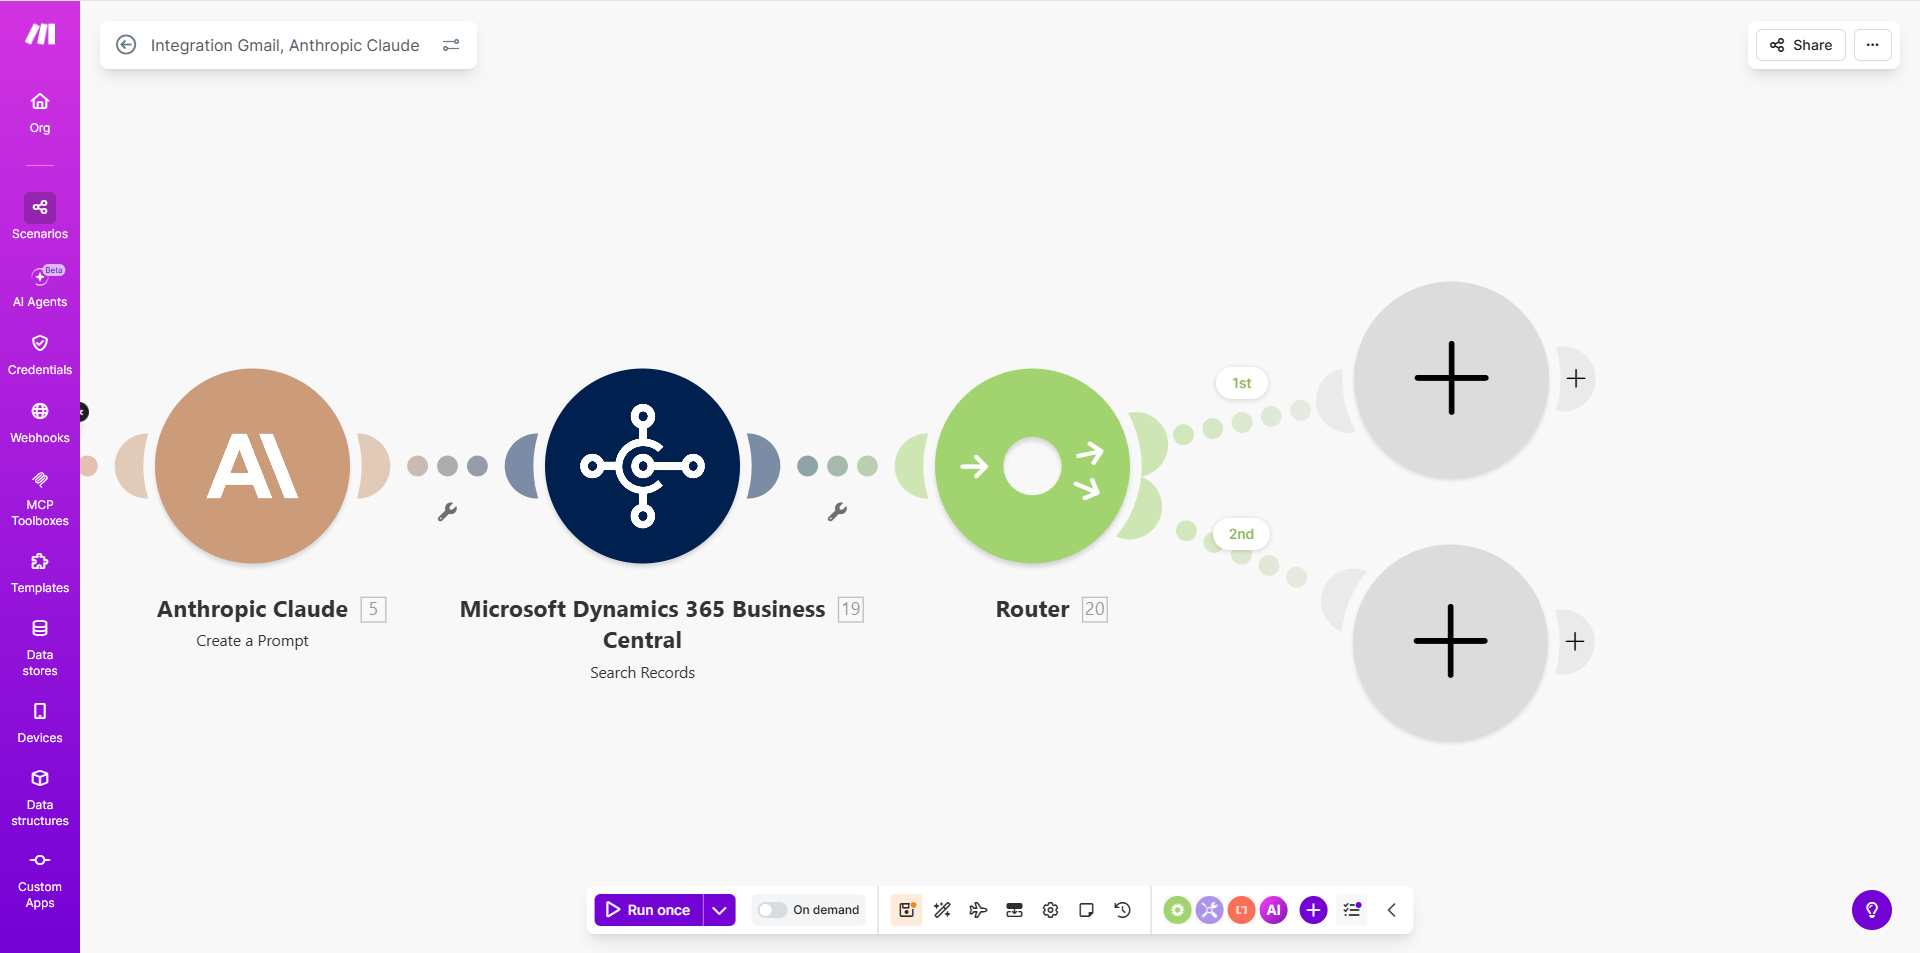
3b. Route the invoice based on what we found. Two outcomes from the Vendors lookup, each with a different response.
How to build a two-branch Router in Make:
- Add a Flow Control → Router module right after the Vendors lookup. Make creates one empty branch for you automatically.
- Right-click the Router module → “Add route” to add the second branch.
- Click the small wrench/bubble icon on the connector line between Router and each branch to open the filter dialog — same dialog as the “Only PDF” filter in Step 2d.
- Build the downstream action modules on each branch.
(You can set filters first and then add actions, or build actions first and filter later. Filter-first is easier to debug because each branch has a clear label.)
Now configure the two branches:
Branch A — Vendor exists (happy path). Filter condition: the Vendors lookup returned something. Set the filter to:
- Label:
Branch A - Field: any field from the Vendors module — it doesn’t matter which one, since if the lookup found a record, all fields have values (we use Number in the screenshot, but Display Name or E-Mail would work identically)
- Operator:
Basic operators: Exists(theExistsoperator sits under the “Basic operators” category, not Text operators — it works on any data type)
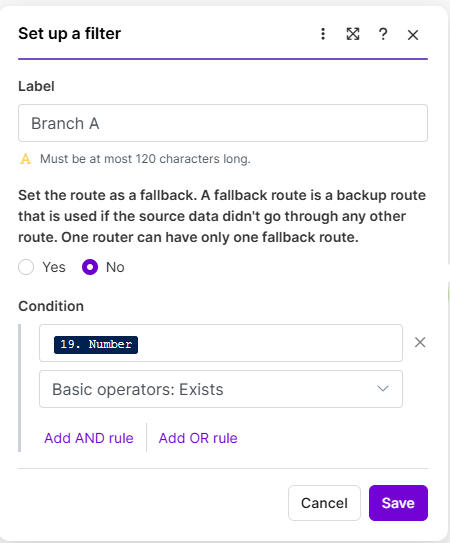
This branch continues to coding, validation, approval, and posting — the rest of the workflow.
Branch B — New vendor (approval workflow). Filter condition: the lookup returned zero records. Set the filter as the mirror image of Branch A:
- Label:
Branch B - Field: same field from the Vendors module (e.g. Number)
- Operator:
Basic operators: Does not exist
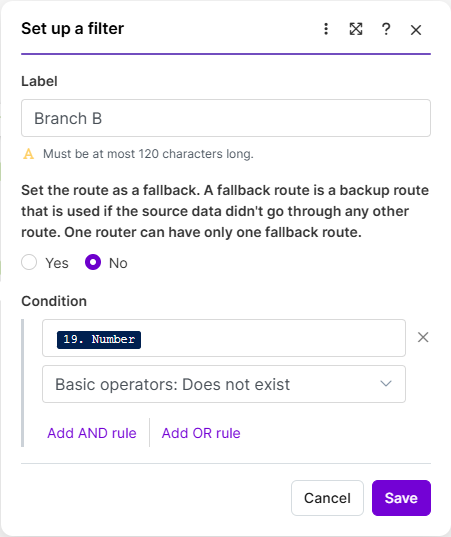
A new vendor is normal business — you pick up new suppliers all the time — but you shouldn’t silently create vendor master records with unverified data. So this branch runs a mini-approval flow.
Work in progress
To be continued…
Slack approvals, vendor creation, coding, validation, posting, and monitoring — coming next.